The occasional skin graft
Keith MacLellan, MD
Pontiac Community Hospital, Inc., Shawville, Que.; Assistant Professor in Family Medicine, McGill University, Montreal, Que.
Can J Rural Med 1996; 1 (2): 83-85
Rural emergency departments see fewer patients, so fingertip injuries are less frequently encountered by individual general practitioners. Many types of finger injuries are complicated enough to demand plastic surgery consultation, regardless of travel and other inconvenience to the patient, but repair of clean avulsions of the fingertip that do not involve bone exposure or fracture is relatively simple and does not require extensive practice or maintenance of competence. Furthermore, the rare complications (e.g., failure of the graft to take) are easily fixed and usually do not involve an increase in the time to healing. This article illustrates step by step a split-thickness skin graft of a simple fingertip avulsion, a procedure often done by junior surgery residents or interns at major teaching centres and well within the reach of rural general practitioners.
The first thing to remember is that simple fingertip avulsions will heal with no treatment other than bandaging. However, in most cases, this healing takes time, as long as 6 to 8 weeks, and the new tissue is fragile. A split-thickness skin graft does not usually improve the end result but will greatly accelerate the healing time, thus allowing much earlier return to full function of the finger. The entire procedure, even without practice, takes about 20 to 30 minutes and can be delayed if other matters in the emergency department are pressing.
Also take note that if the avulsed tip is brought in with the patient, no donor graft is needed. Simple defatting and scraping of the avulsed segment, followed by suturing, as described here, will suffice.
The following criteria should be met before proceeding:
[Table of contents]
Materials
The following materials are needed:
[Table of contents]
Procedure
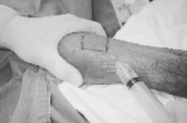
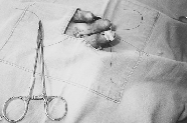
Step 1. Properly prep and drape the injured hand and finger. Put in a digital ring block in the usual fashion, using 2% lidocaine. A sterile rubber band tourniquet can be applied later when the graft is ready.
Step 1
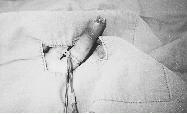
Step 2. Prepare the donor site (the volar aspect of the forearm; very superficial veins should be avoided). Shave and prep the skin, and raise a square intradermal weal (as in a tuberculosis skin test) using lidocaine and a 1.5" 25-gauge needle. The square should be roughly twice the size of the intended graft.
Step 2
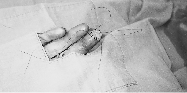
Step 3. Using the dermatome blade and a little mineral oil, slice a thin piece of skin larger in area than the intended graft. The lidocaine intradermal weal will ensure that the sample is thin. Split-thickness grafts incorporate all of the epidermis and variable parts of the dermis. Since the dermis is about 20 times thicker than the epidermis, graft thickness will vary; however, precise uniformity is not important for this type of operation. A sterile razor blade, cut in two lengthwise and held in a hemostat, will do just as nicely for this step of the procedure. A complete dermatome is ideal, but the technique takes some learning and the equipment is expensive unless it is to be used in other procedures.
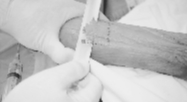
Step 3
Step 4. The excised skin will be ragged at the edges and too large. It should be fitted and trimmed. This is the time to place the rubber band tourniquet and to scrub, clean and debride the graft site.
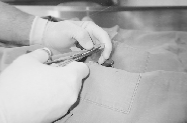
Step 4
Step 5. Suture the graft to the recipient site at four opposing "corners," leaving one end of the cut sutures 5 to 10 cm long at each knot site.
Step 5
Step 6. Suture the remaining edges of the graft to the recipient site, cutting the sutures short. The graft will contract slightly, so it is advisable to trim the graft such that it is larger in diameter (by 1 to 2 mm) than the wound. The fingernail can be trimmed and sutured through, if necessary.
Step 6
Step 7. Cut a piece of lubricated gauze and fold it over to form a thick pillow approximately the size of the graft. Tie it down over the graft using the four longer sutures placed initially. This serves to put pressure on the graft against the recipient site, thus preventing hematomas and helping the graft to take.
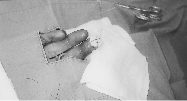
Step 7
Step 8. Remove the tourniquet and dress the graft with a pressure dressing. The donor site can be dressed as a simple abrasion.
The graft should be inspected in 2 to 3 days to make sure that no infection has set in. The sutures and compressive "pillow" can be removed in 10 days. It is not unusual for the edges of the graft to be black, but this appearance is of no consequence. A good graft "take" will be dusky red over almost the whole site. Only rarely will the entire site be black, in which case the procedure should be repeated, after debridement of the recipient site.
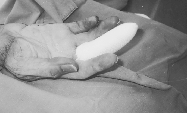
Step 8
[Table of contents]
Conclusion
This simple procedure will save the patient considerable time, expense and incapacity, as well as giving the rural physician a safe, useful and morale-boosting technique.