

Pop Bottle Programming
by Marc Battle
Before you throw another empty two-litre pop bottle into your recycle box, stop and marvel at its design. Have you ever pondered the fact that years of engineering and testing have gone into producing that bottle? That some people have dedicated their lives to that object? And here you are, merely throwing it into your blue box like a sacrifice to some pagan god.
The time has come to stop thinking of plastic pop bottles solely as containers for carbonated beverages. Instead, embrace them as valuable teaching tools for your school-age child care classroom. This article will describe how pop bottles can be used to demonstrate the principles of environmental science, engineering and aeronautics.
Have you ever found yourself in a situation where the children in your classroom are clamouring for environmental science activities, yet all you have on hand are some old plastic pop bottles? Little did you know that you already had the basic props required to create personal composters for home and school use. In fact, pop bottle composters even allow the children to observe the food as it decomposes.
Here's what you'll need:
Here's how to do it:
|
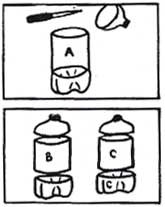
Take one plastic pop bottle (A) and cut the top off with a knife. (Please note: Teachers should cut the bottles beforehand for the sake of safety and maintaining interest in the activity). Take the second pop bottle (B) and cut both the bottom and top off. Take the third bottle (C) and cut both the bottom and top off, only this time, save the bottom piece for use later on. This piece will act as a cap -- an essential element for your composter as it will contain odours and, in the process, help you retain friends. |
|
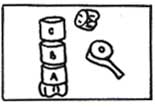 |
Now, comes the tricky part. Insert B into the top of A. Just squeeze the end of B and, with a little patience, it will slide right in. Try to slide it in about one inch. Now, insert C into the top of B -- using the same skill, politeness and patience as before. When all the pieces are in place, wrap tape around the seams to ensure that foul smells cannot escape from the composter. |
|
Next, throw in a handful of soil. Do not use potting soil as the micro-organisms have been zapped, thereby destroying the little guys responsible for breaking down the food waste. Then, add your unwanted food items (keep this a secret from Mom and Dad) and place the cap on top. If you place the composter in front of a window, the process of decomposition will speed up. In a few weeks, you will have some wonderful compost for your garden and the class will have been able to witness the cycle of decomposition. | 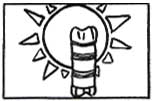 |
What if you want to make the water table more exciting and stimulating, but all you have are a couple of plastic pop bottles, a piece of peg board and some pieces of garden hose. Well, why not make a water machine?
Here's what you'll need:
Here's how to do it:
|
Take a pop bottle, cut off the top, turn the top upside down and install it on the peg board. This can be done by poking two small holes in the pop bottle top and using a pipe cleaner to attach it to the peg board. Now, take the remaining pop bottles, cut off the tops and poke holes in the bottoms. The holes will allow the bottoms to act as strainers. Next, attach the pop bottle pieces and garden hose sections, ensuring that they are positioned to allow water to flow continuously when it is poured from the top. Use Plasticine to seal the joints. |  |
Set up the board in the water table, have the children pour water through the top and watch it flow from pop bottle piece to pop bottle piece via the garden hose, ending its journey in the water table.
I have found it works best if teachers create their own water machines first, in order to demonstrate the purpose behind the activity. After that, the children will be able to come up their own ideas for designs.
What if you want to astound a group of children with an activity so fantastic that they will want to wear T-Shirts with your name emblazoned across them? It's simple -- once you know how to make a water-powered rocket.
|
Here's what you'll need:
|  |
Here's how to do it:
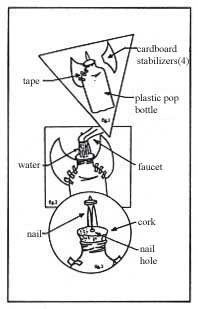
Take a sturdy piece of cardboard and cut out three patterns that will act as stabilizers for the rocket. These pieces of cardboard should be big enough to keep the top of the pop bottle about five inches above the ground.
Secure these stabilizers with tape to the top portion of your pop bottle. Fill the bottle half full of water.
|
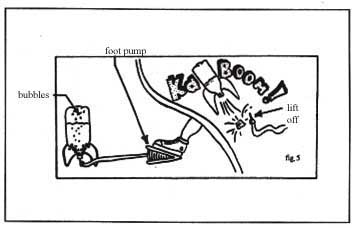
Use a nail to make a hole in the centre of the cork. Insert the cork into the top of the pop bottle and stick the needle of the pump into the nail hole until it is inside the bottle. Take the rocket and your pump outside, preferably away from any toddlers as this activity scares the pants off of them. Step back and start pumping up the pop bottle. As the water starts to bubble, the air pressure in the bottle will start to increase, until eventually, the rocket will go KA BOOM and take off. | 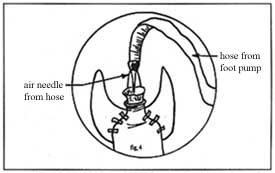 |
 |
I hope I have convinced you to look at plastic pop bottles in a different light. The fact that most citizens on this planet see the pop bottle as a mere vessel for holding fizzy drinks is a great injustice. Pop bottles can be the key to unlocking the imaginations of children, a lightning rod that sparks the cognitive powers of young minds. Or, maybe they're just a cheap way to have fun with some cool activities. |
Marc Battle is a curriculum consultant with ECE Connections at Durham College in Ontario.
|
This article appeared in Interaction (Fall 1994), published by the Canadian Child Care Federation. |

|
Posted by the Canadian Child Care Federation, August 1997. |
 |  |  |