Graphic Design Unit Lesson 6:
Using Adobe Photoshop in Graphic Design
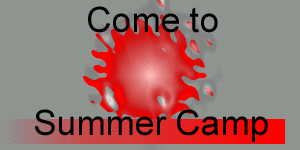
In order to learn how to use Adobe Photoshop, we will
design this "summer camp" image by following
the steps below.

Before we make this image, there are a few things to
know about Adobe Photoshop.
1. Image Size
The size of the image that will be made can be choosen
in centimeters (cm), pixels, or inches. The width and the
height are asked for.
2. Colour Palette
A colour palette or mode is a set of colours of which
the image consists. The most common choices for image
colour palette are:
- Grayscale which is colour from white to gray to
black;
- RGB which is all the colours made from mixing
Red, Green, and Blue together;
- CMYK which is all the colours made from mixing
Cyan, Magenta, Yellow, and Black together.
The choice of palette is up to the artist.
3. Basic Tools
Photoshop contains many of the basic tools of which
any painting program consists. The tool bar can be seen
on the left of the screen.
4. Layers
Layers are one of the most powerful features of
Photoshop. Layers make it possible to do work on one part
of the design at a time without affecting the entire
picture. Each part of the design has its own layer.
Layers can be put in different orders as well, so that
one part of the layout overlaps another.
5. Filters
Filters change the look of the image or word to which
the filter was applied. Some filters put ripples, camera
flashes, or textures on designs.
Now let's make the summer camp image.


Steps to making the Summer Camp image in Photoshop
- Go to File -> New
- Enter in this box a height of 150 pixels and and
width of 300 pixels for the image.
- In this same box, choose the colour mode to be
RGB. Select OK.
- Go to View -> Show
Layers
- View -> Show Colour
Palette
- From the tool bar choose the paint brush tool.
- From the colour palette showing, choose red.
- Place the paint brush tool where the red dot
needs to be and press it once. A red dot should
appear. If it is not the right size, go to View
-> Show Swatches and choose a
different sized brush.
- This dot is Layer 1 on the Layer box that is
showing to the right of the image.
- Make a new layer by going to Layer
-> New.
- Choose the paint bucket tool from the tool bar.
- hoose blue from the colour palette.
- Click on the image once with the paint bucket.
Blue should fill the area.
- In order to see the red dot once again, change
the order of the layers. Layer 2 is the blue and
Layer 1 is the red dot. In the layers box to the
right, select Layer 2 with the mouse and drag it
below Layer 1. The red dot should reappear on the
image.
- Now select Layer 1 from the layer box to the
right by clicking on it once.
- Apply a filter to this layer by going to Filter
-> Render -> Ripples
(if this filter is not there, choose another
one). This should make the red dot into a red
splatter.
- Now apply the -> plastic wrap
filter to this layer as well.
- To make the strip at the bottom of the page,
select the square selection tool at the top left
of the tool bar. Use it to make a strip on the
image. A dotted rectangle should be where the
strip will be.
- Make a new Layer to work on, Layer 3.
- Choose the gradient tool from the toolbar. It is
a rectangle shaded in on one side. Make sure that
the two coloured squares at the bottom of the
tool bar are the blue colour and the red colour
you have used.
- Go to the rectangle with the gradient tool and
drag it from one end of the box to the other
while holding down on the mouse. This will give
the box the gradient look.
- Now make Layer 4 and choose the text tool. Press
the mouse where you want the "Come to"
words to go. Type the text in the box that
appears, press OK.
- Now make Layer 5 and press the mouse where you
want the words "Summer Camp" to appear.
- It is done.
Note: To move any layer around in the image, choose
the move tool, which is the arrow shaped tool at the top
right of the tool bar.
Now the rest of the learning will come with you
experimenting with Photoshop.
|

