 |
Teacher's Corner |
|
Teacher's Corner |
 GLOSSARY TEACHER'S CORNER INDEX kINDERGARTEN & GRADE 1 ACTIVITY 1 ACTIVITY 2 GRADE 2 & 3 ACTIVITY 1 ACTIVITY 2 GRADE 3 & 4 ACTIVITY 1 ACTIVITY 2 GRADE 4 & 5 ACTIVITY 1 ACTIVITY 2 SITE CONTENTS |
Your Room Today 1.) Draw a Floorplan of Your Room A floorplan is a plan that describes the size and the shape of a building. A floorplan can be made for one room or for all the rooms in a building. We will start by looking at at the floorplan for the ground floor of Wells Centennial Hall. Notice how a floorplan is a drawing that is shown from above. From looking at the drawing you get an idea of the shape of the room. The walls, doors and windows are drawn using different weights and thicknesses of lines, and other features such as staircases are drawn in too. The different rooms are neatly labeled. Can you see where the gymnasium and the kitchen are? Can you find the gymnasium bleachers on the floorplan? Next we will look at the basement floorplan of The Bastion. It is an old fort built in a hexagonal shape. Remember, the Bastion was used as a jail, and so the floorplan shows the prison cell and the thick, reinforced stone walls of the fort. Print out both examples. Refer to these floorplans when you are drawing the floorplan of your room. In order to plan or build a building it's necessary to have a floorplan. A floorplan is a kind of a pattern that tells architects, draftsmen and tradesmen what size to build. Floorplans show the building dimensions of the whole and the parts. The final, working copy is called a blueprint. Drawing a Floorplan: In this project we are going to draw a simple floorplan of your room. You will need the following supplies.
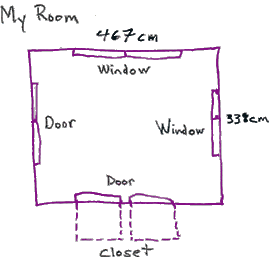
1.) Go home and use a tape measure to measure the length of each wall of your room. You might need someone to help you hold the tape measure. Record the width of each wall in your room in centimeters. It will be quite a big number, but when we change the drawing measurement to scale, the number will get smaller. 2.) Make a quick rough sketch to get an idea of the overall proportion of the room. 3.) Write down the measurements on the rough drawing. Your rough sketch should look similar to the drawing on the right. The Final Drawing Make sure you pay close attention to detail and use careful workmanship. Follow the links below for more information. Part 2: Your Room Long Ago You probably have some really wild stuff in your room. Some of you might have computers, Easy Bake ovens, televisions, robots and posters of outer space. We are going to go back in time. Imagine your room is completely empty. Imagine you are a child living in Fort Steele or the Ozeroff Doukhobor Village. What would your room be like back then? What would you own? Would you share the room with sisters, brothers or other kids? Maybe you all sleep in bunk beds. How would the furniture be arranged? What colour would the room be painted? What kind of toys would you have? Does your room have wallpaper? What does the wallpaper look like? Your assignment is to redecorate your room the way it would have been a hundred years ago. Go visit the kids rooms at Craigflower Farm to get ideas. Make a collage, drawing or a 3-D model for the final project. |
|||||
 |
 |
 |
 |
| Last updated 31 August 1998. This digital collection was produced under contract to the Canada's Digital Collections Program, Industry Canada. Produced by Canada's Digital Collections Team. Content provided by BC Heritage Trust and Heritage Branch, Province of British Columbia. |