| About us | Contact us | Services | Copyright | |||

| Back Issues | News & Events | Junior Rockhound | Resources | Clubs | Dealers | Web Links | Home |
| |||||
| |||||
| |||||
|
Copyright
How to Tumble and Polish By Ron Shannon
I will first present a quick overview on tumbling, followed by the details for each step. I've also included a few helpful tips and hints at the end of the article. For your convenience, you may want to to print this page.
There are 5 steps to complete most tumbling loads. These are as follows:
1. Coarse GrindingThis is the work-horse step where you decide what style your finished stones will have. (Well-rounded edges or sharper angular edges.) The longer you leave stones in the coarse stage, the rounder and smoother the finished product will be. I personally prefer the rounder smoother type. Hardness has an impact, therefore all my info is geared to stones with a hardness of mohs 7. For mohs 6 cut all times by half and for mohs 5, cut all times by half again. Stones 4 and softer require special attention and you need to gain experience at mohs 7 first.
2. Medium GrindingAfter completion of coarse grinding, thoroughly wash all grit from the stones before charging tumbler with medium grit. Do not pour the slurry down the sink as it is dense and can clog drains.
3. Fine GrindingAs per step 2, and then proceed to the polish step.
4. PolishingThis step requires a knowledge level of rocks to develop as there are 5 or 6 different types of polish. The best all purpose polish is Tin Oxide but it is pricey at $30.00 per pound. I use Cerium Oxide at $20.00 per pound as it will polish 99% of all stones, and use Tin Oxide on only those stones that require it, i.e. Obsidian.
5. BurnishingThis is a 15 minute laundry detergent step that is just like washing dirt from clothes. The scum is literally washed from your polished stones and puts that extra good sparkle onto them.
Step 1:Fill tumbler barrel to 3/4 full with stone. Stone size should not exceed 1" and the load needs to vary in size, preferably from 1/4" to 3/4". Add water until the water level can be seen but does not cover the top-most stones. Add the number of heaping tablespoons of coarse grit as the size of your tumbler. Coarse grit ranges, sizewise, from #45 to #90. Properly and securely install the lid and then allow to rotate 24 hours per day for 2 to 3 weeks. Patience is a virtue as 3 weeks produces better looking finished stones.Normally, you do not need to "Burp" the tumbler as most quartz, agate and jaspers do not produce gas. If organic material gets into the load, e.g. bone, gas can be produced. If the load is inspected before the 3 weeks are up, be sure the lid area is thoroughly cleaned to prevent a poor seal and resulting leakage.
Step 2:After 3 weeks, open barrel and wash rocks and barrel to remove all traces of coarse grit. The slurry may be flushed or disposed of in the garden etc. Do not try to save the slurry for later use as it tends to set up similar to concrete. Return all stones to the barrel, noting that you have lost about 40% of your original volume. This is normal and occurs with every load. The remaining steps lose very little material and volume as this is the beginning of the polishing process. With the stones in the barrel, add water as in step 1 until it is visible but does not cover the stones. Now add the number of heaping tablespoons of medium #220 grit, replace lid, and rotate for 1 week.
Step 3:After 1 week, open barrel and wash rocks and barrel again until clean disposing of the slurry in the same manner as in step 1. Return the rocks to the barrel, add water as before, then add the number of heaping tablespoons of fine #500 or #600 grit. Replace lid and rotate for 1 week.
Step 4:After 1 week, open barrel and wash rocks and barrel thoroughly. Replace stones into barrel, add water as before, then the polish compound of your choice, Cerium Oxide or Tin Oxide, again in heaping tablespoons to the size of your tumbler, i.e. 3 tablespoons for a 3 lb barrel. Also, cut a 1/2" square of bar hand soap and add this to the barrel. It aids in the polishing action. At this stage, if the tumbler volume is less than 50%, add 10% to 15% of plastic pellets to bring the volume over 50%. When the barrel volume is less than 50%, proper tumbling action does not occur. The maximum volume of plastic pellets is 20%. Replace lid and rotate for 1 week.
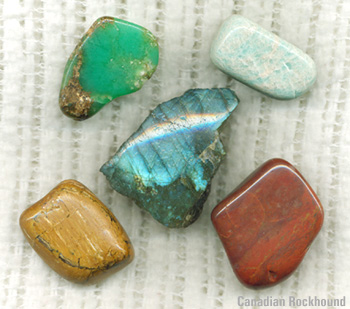
Step 5:After 1 week, open barrel and thoroughly wash rocks and barrel. Replace stones into barrel and add 1 tablespoon of powdered laundry detergent, close barrel and rotate for 15 to 20 minutes. Open barrel, wash again and admire the quality of the finished polished stones!
There are many American and several Canadian dealers who sell tumbling supplies and lapidary equipment. In Canada, it is sometimes difficult to find dealers, as some advertise only locally. However, nearly every major Canadian city has a least one supplier. Some dealers also live in rural towns. So one has to do a bit of searching. The benefit of going through a Canadian dealer, of course, is that you don't have to worry about postage, currency exchange, and tariffs. The Canadian Rockhound magazine has several suppliers listed in its dealers section. Also, check the yellow pages, and try contacting local clubs, as they will likely know of a local supplier.
This article may not be copied, distributed or reprinted in any form without permission from the author. To contact the author, please use the e-mail address provided. If you are unable to contact the author, please contact the Canadian Rockhound. Authorized reprints must acknowledge the authors and the Canadian Rockhound, and include the website URL address of the Canadian Rockhound.
Shannon, R. 2002. How to Tumble and Polish Your Stones. Canadian Rockhound. 6(2):3 [http://www.canadianrockhound.com]
 
Copyright © 2002 Canadian Rockhound
Back Issues |
News & Events |
Junior Rockhound |
Resources
|